Configuring Distributed Dynamips for GNS3
Machine A - mainly run Dynamips. Chose Linux (Ubuntu) as it better handles Dynamips. IP address - 192.168.1.20
Machine B - mainly run GNS3. It uses Machine A's resources for Dynamips. Of course, Machine B can have its own local Dynamips instance to handle additional load if necessary. Chose windows as it is the main device to interact with the engineer. IP address - 192.168.1.224
Machine A Setup
1. To install GNS3 in Ubuntu, go to Ubuntu Software Center and search gns3 to install.
2. After installation, we can know the location of gns3 and dynamips by using which command.
3. Start GNS3 by using
sudo /usr/bin/gns3. Go to Preferences and take note of Dynamips Base port number and test the settings to make sure it can run properly.
4. Copy the IOS images to the folder - /home/images/ in this case.\
Machine B Setup
- Go to GNS3 Preferences->Dynamips and choose a different base port (e.g. 7201). Test the settings if it's successful.
2. We might need to change IP/host binding in Hypervisor Manager as below.
3. Go to IOS imanges and hypervisors->External hypervisors. Here we need to add
Machine A as external hypervisor with default port and Base UDP port.
4. We also add Machine B (local machine) as external hypervisor as well with different port and Base UDP.
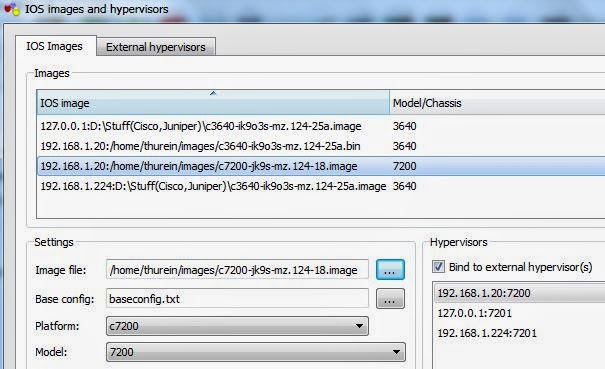
5. Next, we add IOS images from
Machine A. Be sure to key in exact path of image on
Machine A. Select an external hypervisor as 192.168.1.20 - its IP address.
6. We can add IOS images from
Machine B if we also want to use this GNS3 machine for dynamips
. Select an external hypervisor as 192.168.1.224 - its IP address.
Running the pieces together
1. Before we add devices in GNS3, we need to start Dynaimps on
Machine B and also
Machine A.
2. On
Machine B, start Dynaimps by issuing
sudo /usr/bin/dynamips -H 7200 as shown below.
3. On
Machine A, go to GNS3 installation folder - C:\Program Files\GNS3 and edit dynamips-start.cmd to run on 7201. Start dynaimps and Dynamips will run as below.
4. In GNS3, add the router and it will ask you which image you want to use. You can choose either images from 192.168.1.20 or 192.168.1.224
5. Add the routers using images from both machines and test the inter-connectivity from the routers.
That's it.